It’s quite possible to have both Windows PC and Macs at your place or home. So, what do you do when it’s time to transfer files from Windows PC to Mac? In this guide, we shall show you 5 simple steps you can follow to share files between Windows and Mac. Windows PC and Mac computers can communicate to each other quite easily and there are just a handful things you must do to set them up. In this guide, we shall use the WiFi method, which probably the simplest of them all. However, make certain that the Windows PC and Mac are connected to the same WiFi network.
How to share files between Windows and Mac Computers.
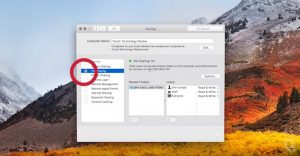
Click on the Apple logo in the top left corner of the screen. On the system preferences menu, select sharing. Make sure File sharing is checked on the left menu.
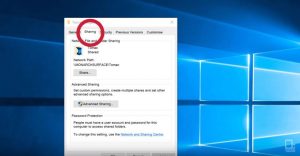
Click on the Windows logo on the bottom left corner of the screen. Select the Settings icon and then click network and internet. Select sharing options and make sure the first option network discovery is turned to on. Also, turn on files and printer sharing. Right click on an empty area of the Windows PC desktop and click create a new folder. Give it a name and then hit enter. After creating the folder, right-click on it and then select properties. On the properties window, select ‘Sharing’ tab. Click on the Advanced Sharing button which lies just below. Select ‘Share this folder’ check box. On this same window, click the options button and make sure ‘Read’ and ‘Change’ are checked. This is to change the properties of the folder to enable full access for sharing.
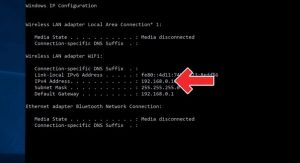
Head over to command prompt on your Windows PC by clicking on the Windows Icon and then searching for Command prompt. In the Command prompt, type “IPCONFIG” as one word and hit enter.
This will show you a range of different IP numbers for your computer. However, we are interested in the “IPv4” address.
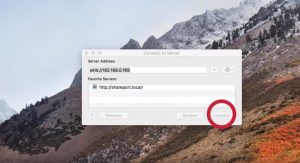
On the Mac, click Go and then select the last option on the menu that reads ‘Connect to server’. Type in the prefix smb:// followed by the IP address we saw on the Windows PC and then hit connect.
A login screen where you must enter your windows PC username and password will pop up. Fill in the details and then hit enter. This might take a few minutes to connect so be patient. On your Mac, you will see a disk image with the name of the folder you created. You can then drag and drop files to it and they will be visible on Mac and Windows PC. That’s it guys, you will be able to share files between Windows and Mac computers using the above simple steps.